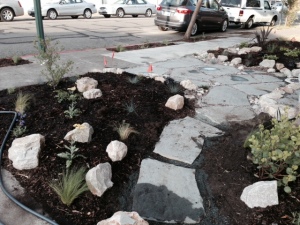
We’ve recently installed a new front garden – a nice bevy of native and drought-tolerant plants, along with a bit of functional hardscape (I’m learning the landscaping terminology) in the form of a meandering pathway to the front door. In addition to improving the patches on all sides of our home, it’s turned out that this garden project has awarded other benefits – useful lessons in teaching and learning and a well-timed reminder of how incredibly difficult it is to do this education stuff right.
Our guide on this project, Liz Simpson, is an experienced landscape designer, who specializes in native plants. I’ve worked with her on and off for the last six months, planning, sketching, preparing the soil, etc. and have found her delightful to work with – flexible, clear-thinking, and imaginative. In an attempt to marshall the budget on this project, I volunteered to be the laborer, along with my husband. That meant that we did the sheet mulching (see earlier post), the soil preparation, the digging and planting, and, eventually, the installation of a drip irrigation system. Needless to say, there was a lot to learn.
The actual installation took place over a three-day period – 197 plants and lots of mulch. Liz was there the whole time, overseeing the work, making sure we plopped the plants in the right places and heaving the flagstones into place herself, with the help of two, strong-backed helpers. It was all hard work, no doubt about it, but we got it done and were very happy with the results.
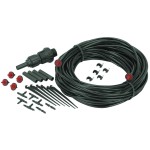
Then came the irrigation system. These are drought-tolerant plants, but they do need some water, and given our current complete lack of rainfall in California, the drip system was called for. Liz brought over all the gear – tubing, emitters, brackets, couplers, goof plugs (my personal favorite) – and gave me a thorough tutorial on how to assemble the bits and pieces into a working system. It’s a bit like a tinker toy operation. The parts are designed to fit together, snap in place, and be flexibly positioned so that each plant has its own wee stream of water delivered right to its root ball.
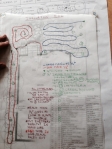
Liz had carefully assembled all of the components of a productive teaching and learning experience for me. She would explain, demonstrate, and give me resources – then I would be on my own for the ultimate assessment – a properly installed system. I listened carefully to Liz’s “lecture”, watched her as she “demonstrated”, consulted the overall irrigation paper plan (“textbook”), and felt confident in my ability to complete the job.
Sound familiar? Bet you know where I’m going with this.
Two days later, we set out to install the thing. It quickly became apparent that this was going to be harder than I’d thought. There were elements that weren’t covered in my “lesson”, nuances to the execution that were eluding me. For one thing, the black, mainline hose turned into a serpent creature, taking on unforetold behaviors, roiling in unexpected directions and just generally being a pain in the ass. Furthermore, in what order should we work – should I lay out the hose first, stake it down, and then punch holes for the emitters? Or is it better to install each emitter as you worked, laying out the hose in small segments? Complicating the whole enterprise was the fact that the “punch and insert” action required to add the emitters was extremely difficult – first, you have to get the hole just right (straight on, not at an angle) and then, when you push in the emitter, the hose sort of collapses on you, failing in the face of all that pressure and pushing (I distinctly heard it mocking me). What’s more, everything has a proper orientation that must be remembered – right side in, path of water to plant, uphill versus downhill. What had, at first, sounded like a pretty straight-up affair was quickly turning into a Herculian task that I felt less and less qualified to complete. My fingers and hands fatigued quickly and we opted for a tag-team approach, I’d punch the hole, my husband would come along behind and land the emitter (later, it became apparent that was a very bad plan).
By hook or by crook, we finished the first half of the system and decided to call it a day. Not only were we both wiped out, I thought it wise to ask Liz to review our work, just to make sure we were on track, before starting the second half.
When she arrived to check out our progress, I could tell by the look on her face that our performance had not met the grade. We failed the assessment. In fact, we were destined for remedial work. In addition to improper hose placement, incorrect distances (emitter to plant) we had installed every single emitter backwards. Yup, you heard me, backwards.
Good grief. Ok, let’s just review for a minute. Liz had done everything that a teacher should do with a naive student:
1. Explanation. She explained the content, using language the learner understood, giving clear examples, making helpful analogies.
2. Demonstrate. She demonstrated the method for me, then had me do one with her watching (“watch one, do one”).
3. Reference. She left me with a detailed description in print for reference, should I need it.
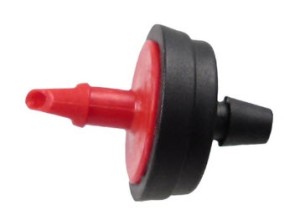
So, what went wrong? A dissection of this mess-up is kind of interesting, actually (that is, when I can get over the humiliation of being so colossally mistaken). First, let’s take a look at the emitter:
Liz’s description was to insert the red side into the hose and the black side would face out. Couldn’t be easier, right? Not only that, but if you look at the structure of the beast, you can clearly see that the red side is fashioned to accept the water flow and the black side is crafted to “emit” water. But somehow, I got it in my head that the black side would go in to the mainline hose …it matched with the black of the hose, it made a continuous color whole, whatever. That was the model I had in my head. And even though she left me a correctly completed example and it was written down on the printed irrigation plan (in words, not pictures, I should point out), my misconception was firmly established and I proceeded to install each and every emitter with the black side in and the red side out. Wow.
I suspect that a picture might have made a difference for me. Either a photograph or a colored diagram, showing insert A to B here, in this way. Why the actual physical model of a properly completed one didn’t serve that purpose completely baffles me.
It’s also worth taking a moment to ponder why I didn’t more carefully scrutinize the structure of the emitter itself. If I’d studied its functional design and reasoned my way toward a complete understanding of why the red side goes in, I suspect that would have helped. I suspect that understanding the orientation – as opposed to memorizing the color scheme in a garanimals approach – might have worked. But it did not occur to me to do that. Does that have to do with my lack of experience in building/assembling? Or is is a lack of native how-to sensibility?
What’s more, I suspect the number of details to keep track of got in the way; as if my brain could only hold onto so much information and just plowed ahead with its own managerial method. As we worked the logic of my approach felt more and more rationalized. Of course, this is the way to do it!
Interestingly, when Liz came to inspect the work, undoubtedly taking pity on us, she stayed for the rest of the morning and we finished the remaining circuit all together. This allowed lots of ongoing observation and regular check ins. “Do you mean, like this?” “How deep exactly should the hose be buried?” “Where do you put your thumb when you punch the hole?” The opportunity to watch her in action over a sustained period made a significant difference – wrestling with the main line hose, tapping in the brackets, how she kept her tools nearby, the way she positioned her body in relation to the hose when punching the emitter hole. I gained a much deeper and more practical insight into the proper method, not to mention the hard-to-explain-in-words nuances of the approach. It also allowed me to ask context-specific questions and get the answers when I needed them.
So, bottom line, our little exercise in irrigation underscores a couple of important education reminders:
- Pictures really make a difference.
- We hang onto our misconceptions with a death-grip.
- The apprentice model really works.
Now. If I can just remember….red in. black out.


With learning to be had all around, I contend Liz could have been a better teacher too.